Ford 4.6 & 5.4 Modular V8 Head Bolt Torque & Sequence (2V, 3V, 4V)
By WhatSizeBoltEdited 14 min read14 source links
Ford Modular 4.6L/5.4L head bolt torque is a staged torque-plus-angle spec on single-use bolts, and the exact steps depend less on 2V/3V/4V than on which plant built the engine: Windsor-built trucks use a 3-stage procedure, Romeo-built cars used a 6-stage procedure through 2004. Factory 10-bolt sequence, ARP replacement values, Fel-Pro gasket notes.
Search "Ford 4.6 head bolt torque" and every result gives you the same three numbers: 40 Nm, 90 degrees, 90 degrees. That is correct — for a lot of these engines. What almost nothing mentions is that Ford ran a completely different, six-step procedure on the same displacement, in the same years, depending on which factory built the block. Use the wrong one and you either leave the bolt short of yield or skip a loosen-and-retorque step Ford put there on purpose.
What this article covers
SOHC 2V and 3V, DOHC 4V — 1991-2014, both Romeo and Windsor plants.
The Modular name covers every 4.6L and 5.4L SOHC/DOHC Ford V8 from 1991 to 2014: 2-valve (2V) SOHC in the F-150, Expedition, Crown Victoria, Explorer and base Mustang GT; 4-valve (4V) DOHC in the SVT Cobra, Mach 1, SVT Lightning and Ford GT/GT500 supercharged variants; and 3-valve (3V) SOHC with variable cam timing in the 2004+ F-150, and 2005+ Mustang GT. Two different plants built these blocks — Romeo, Michigan (cars: Mustang, Panther-platform sedans) and Windsor, Ontario (trucks and SUVs) — and as the table below shows, the plant matters more to the torque procedure than the valve count does.
Ford Modular head bolt torque specs
Same target, different number of steps — and it splits by plant, not by 2V/3V/4V.
| Engine / plant | Procedure |
|---|---|
| 2V & supercharged 4V, Windsor F-150, Expedition, E-Series, SVT Lightning · FSM 2003, 2011 | 40 Nm (30 lb-ft) → +90° → +90° |
| 2V, Windsor, earliest year sampled F-150 · FSM 1997 | 37-43 Nm (27-31 lb-ft) → +85-95° → +85-95° (same 3 stages, wider factory tolerance) |
| 3V, Romeo Mustang GT · FSM 2005 | 40 Nm (30 lb-ft) → +90° → +90° |
| 2V & 4V, Romeo Mustang GT, Cobra, Mach 1 · FSM 1999–2004 | 40 Nm → +90° → loosen all bolts ≥1 full turn → 40 Nm again → +90° → +90° |

The bolts and the block
Aluminium block and heads on every 2V sampled — the same is true across the Modular family.
| Spec | Value |
|---|---|
| Thread & length (4.6L 2V) | M11 x 1.5, 210.5mm — the 5.4L uses a longer version of the same thread for its taller deck |
| Count | 20 per engine — 10 per cylinder head |
| Type | Torque-to-yield (TTY) — permanently stretched, replace every time |
| Block & head material | Aluminium with a steel cylinder sleeve, both Romeo and Windsor 2V |
| Lubrication | None. Install dry. |

That last material line is worth spelling out: it is common to assume the truck-spec Windsor block is cast iron and the car-spec Romeo block is aluminium. Summit Racing’s own 4.6L 2V spec sheet says otherwise — both are aluminium with a steel cylinder sleeve. The real difference between the two plants, on this evidence, is the torque procedure above, not the metal.
Ford went to non-reusable, a bolt is a spring-style head bolts across the whole Modular line from the first 1991 engines. A TTY bolt is meant to yield past its elastic limit — that is how it holds a consistent clamp load through heat cycling — so it cannot be torqued a second time to the same clamp force. Every factory manual fetched for this article carries the identical warning: discard the old bolts, install new ones.
Tightening pattern
Ten bolts per head, worked from the centre outward — the same order on every variant.

Run the entire pattern at each stage — every bolt to the first torque figure before any bolt sees an angle, then the whole sequence again for the next stage (and, on a Romeo 2V/4V through 2004, a third time after the loosen step). Never take one bolt straight to final torque and move on: that pulls one corner of the head down against a gasket the rest of the head hasn't touched yet.
How to torque Modular head bolts, step by step
The prep and the loosen step (where it applies) matter as much as the numbers.
- Confirm which procedure your engine uses — check whether the block was built at Romeo or Windsor and pull the torque table for your specific model year before you start. Do not assume 2V, 3V and 4V share one number.
- Clean the block threads — debris or old sealer in a blind hole absorbs torque that never reaches the clamp load.
- Fit the head gasket dry. Every factory manual fetched here is explicit: no sealing aids, no aviation cement, no copper spray. The gasket goes on dry.
- Install new bolts, lightly oiled per the manual, and loosely at first.
- Stage 1: 40 Nm (30 lb-ft) on every bolt, in sequence, with a calibrated torque wrench (37-43 Nm if you are working from the 1997-era Windsor spec).
- Stage 2: fit a torque angle gauge and turn each bolt +90° in the same sequence. Counting hex flats is not accurate enough on a bolt already being pushed past yield.
- If your procedure is the Romeo six-stage: loosen every bolt at least one full turn, then repeat stages 1 and 2 exactly. If it is the three-stage Windsor/3V procedure, go straight to stage 3.
- Final stage: another +90° on every bolt, in the same sequence, and you are done.
ARP replacement values
Aftermarket studs are not TTY — and ARP's kits run pure torque, no angle, in their own numbers.
| ARP kit | Application | Torque |
|---|---|---|
| 156-4101 / 156-4301 (M11 head stud kit) | 4.6L & 5.4L 2V and 4V | 25 → 50 → 70 ft-lb, no angle pass |
| 256-4002 / 256-4202 (M11 head stud kit) | 4.6L & 5.4L 3V | 30 → 60 → 85 ft-lb, no angle pass |
ARP studs are conventional, reusable fasteners — not torque-to-yield — which is part of why builders replace the factory TTY bolts with them at all. Both instruction sheets call for ARP Ultra-Torque Fastener Assembly Lubricant (part 100-9910, the 10 oz brush-top can) on the stud threads and under the nuts, and both warn that the cylinder head and washer mating surfaces must be completely free of oil before the nuts go on dry against them — oil there causes inconsistent preload. Both kits draw the identical 1-10 bolt topology as the factory diagram above (ARP draws it from the side, not from the top). Follow the instruction sheet in your specific kit box; ARP updates part numbers and torque values over time.
Gasket notes (Fel-Pro)
Modern MLS gaskets are designed to go on dry — sealer is what causes the leak.
- No sealer, no RTV. Fel-Pro's own guidance: a properly designed Fel-Pro head gasket needs no additional sealant, and using RTV on one “can actually hinder the gasket's ability to form a reliable seal, causing leaks.” This matches every Ford factory manual fetched here, which all call for the gasket to be installed dry.
- A correctly designed gasket is a true no-retorque design. Fel-Pro's PermaTorque line is built so it does not need a hot retorque after the first heat cycle — older retorque-style gaskets still do.
- Surface finish has to match the gasket. Fel-Pro recommends 50-60 Ra for aluminium heads and blocks (60-80 Ra for cast iron); its PermaTorque MLS coating tolerates repair-environment finishes as rough as 80 Ra. Deck flatness should not exceed .002" across the width of the surface.
- Keep the fasteners with their hole. Fel-Pro flags this for engines where bolt length varies by position — lay bolts out in the order they came out and return each one to its own hole.
Nearby fastener torques
The other fasteners you disturb getting to the head — from the same 2005 Mustang 3V manual.
| Fastener | Torque |
|---|---|
| Exhaust manifold nuts (8 per side) | 25 Nm (18 lb-ft) |
| Camshaft phaser sprocket bolt | 40 Nm (30 lb-ft) → +90° |
| Camshaft bearing cap bolts, timing chain guides, valve cover bolts | 10 Nm (89 lb-in) |
| Crankshaft pulley bolt (new bolt, 4 stages) | 90 Nm (66 lb-ft) → loosen 360° → 50 Nm (37 lb-ft) → +90° |
Confirm these against the manual for your specific year and engine — they come from the 2005 Mustang 4.6L 3V workshop manual and are close, but not guaranteed identical, across every 2V/4V application.
Tools and parts for the job
The angle gauge is not optional on a TTY bolt — order anything you are missing before you start.
Some links below are Amazon affiliate links — as an Amazon Associate we may earn a small commission at no extra cost to you.
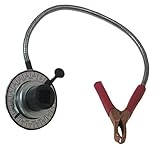
Lisle 28100 torque angle meter, 1/2" drive
Every factory Modular procedure ends in one or two +90° passes on a bolt already near its yield point. A 1/2" drive angle gauge is the only accurate way to turn exactly 90° — counting hex flats is not close enough. The Lisle is the shop-standard unit; the OEMTOOLS 25424 does the same job for a third of the price.

EPAuto 1/2" click torque wrench, 10-150 ft-lb
A calibrated click wrench for the first stage. Every stage after it is angle, so the starting torque has to be right — 30 lb-ft sits comfortably inside this wrench’s range.

Fel-Pro ES 71328 head bolt set, 4.6L/5.4L Modular
Twenty new M11 x 1.5 torque-to-yield bolts — Fel-Pro’s set for the Modular V8, listed for the 2V trucks, the 4V Panoz/Qvale cars and the F-150 through 2010. Run Amazon’s fit check against your exact year and engine before ordering. Reusing the old bolts is the most common cause of a repeat head gasket leak.

Fel-Pro PermaTorque MLS head gasket set
The part number changes with year and model, so pick by fitment. Direct fits: HS 9790 PT-4 (1997–98 F-150, F-250, E-Series, Expedition) · HS 9790 PT-12 (1999 F-150, F-250, Expedition, Navigator) · HS 9790 PT-18 (1999–2001 F-150) · HS 9790 PT-7 (1995–2000 Crown Vic, Town Car, Grand Marquis; 1996–98 Mustang) · HS 9790 PT-3 (1996–2001 Mustang, Continental, Mark VIII, Marauder) · HS 26306 PT (5.4L 3V 2004–06 F-150, Expedition, Super Duty, Navigator). Anything else, search below and run Amazon’s fit check. PermaTorque MLS needs no supplemental sealer and no hot retorque.
Common mistakes
Six ways a Modular head job comes back.
- Using one torque number for every Modular engine — the Windsor/3V 3-stage spec and the Romeo 2V/4V 6-stage spec are different procedures, not the same number counted differently.
- Reusing the old head bolts — they are torque-to-yield and already stretched past their elastic limit. New bolts, every time.
- Skipping the loosen-and-retorque step on a Romeo 2V/4V — leave it out and the bolts never reach the intended clamp load, even though the numbers on stages 1-2 look identical to the simpler spec.
- Assuming the truck block is cast iron — both Romeo and Windsor 2V blocks are aluminium with a steel sleeve; the plants differ in the torque procedure, not the metal.
- Sealing a modern MLS gasket — RTV or sealer on a gasket designed to run dry is a leak waiting to happen, not extra insurance.
- Guessing the angle by socket flats — a hex flat is 60°. Getting to exactly 90° needs an angle gauge, not a count.
Frequently asked questions
What is the head bolt torque on a Ford 4.6/5.4 Modular V8?
Most of them — every Windsor-built truck engine (2V and the supercharged 4V) and the 3V — go 40 Nm (30 lb-ft), then +90°, then another +90°, all ten bolts per head. Romeo-built car engines (1999-2004 Mustang GT and Cobra/Mach 1) instead run a six-stage procedure that adds a loosen-and-retorque cycle in the middle. Confirm which plant built your engine before you start.
Are Ford Modular head bolts torque-to-yield?
Yes, on every 2V/3V/4V variant fetched for this article. They stretch permanently when torqued and cannot be reused — every factory manual sampled here says to discard the old bolts and install new ones.
What is the head bolt tightening sequence on a Ford Modular V8?
Ten bolts per head, worked from the centre pair (bolts 1 and 2) outward in the numbered order shown above. That order is unchanged across every FSM year fetched for this article (1997 and 2003 F-150, 2005 Mustang) and matches ARP's own kit diagram — only the torque procedure changes by variant.
Is a Windsor-built 4.6/5.4 block cast iron?
No. Summit Racing's own 4.6L 2V spec sheet lists the block as aluminium with a steel cylinder sleeve, the same as the Romeo-built version. The real difference between the two plants is the torque procedure, not the block material.
Do I need ARP head studs to have a reusable bolt on this engine?
The factory bolts are single-use TTY either way. ARP's stud kits (156-4101/156-4301 for 2V/4V, 256-4002/256-4202 for 3V) are conventional reusable fasteners torqued to their own straight-torque spec — 25/50/70 ft-lb or 30/60/85 ft-lb — with no angle pass, but they are a different fastener from the factory bolt, not a drop-in replacement torqued to the factory number.
Bottom line: torque every Modular 4.6L/5.4L head bolt to the numbered 10-bolt sequence above, but match the procedure to the actual engine in front of you: Windsor-built trucks (2V and supercharged 4V) and the 3V go 40 Nm, then +90°, then +90° — three stages. Romeo-built cars (1999-2004 Mustang GT and Cobra/Mach 1) run the same first two stages, then loosen every bolt a full turn and repeat the whole thing — six stages. The bolts are single-use torque-to-yield either way, installed dry, replaced every time, and an angle gauge isn't optional on the pass that finishes the job.
Keep going
Sources
- 1997 Ford F-150 4.6L 2V factory service manual (reproduced by Operation CHARM) — 37-43 Nm / +85-95° / +85-95° and the numbered 10-bolt diagram, drawings A26257-A/A26259-A/A26260-A.
- 2003 Ford F-150 4.6L 2V factory service manual (Operation CHARM) — 40 Nm / +90° / +90°.
- 2003 Ford F-150 5.4L 2V factory service manual (Operation CHARM) — identical 40 Nm / +90° / +90° on the larger displacement.
- 2003 Ford F-150 5.4L supercharged 4V (SVT Lightning) factory service manual (Operation CHARM) — same 3-stage Windsor procedure on a 4V engine.
- 2011 Ford E-150 5.4L 2V factory service manual (Operation CHARM) — confirms 20 bolts total (10/head), same 3-stage procedure.
- 2005 Mustang GT 4.6L 3V workshop manual, section 303-01B (Ford Motor Company PDF, hosted at themustangsource.com) — 40 Nm / +90° / +90° and drawing N0010205 confirming the same 10-bolt order.
- 1999-2004 Mustang GT 4.6L 2V factory service manual, Cylinder Heads (Installation) — the 6-stage Romeo procedure.
- 1999-2004 Mustang Mach I 4.6L 4V factory service manual, Engine (Assembly) — the identical 6-stage Romeo procedure on the 4V.
- ARP instruction sheet 156-4101/156-4301 — Ford Modular 4.6L/5.4L 2V/4V M11 head stud kit, 25/50/70 ft-lb, no angle.
- ARP instruction sheet 256-4002/256-4202 — Ford Modular 4.6L/5.4L 3V M11 head stud kit, 30/60/85 ft-lb, no angle.
- Summit Racing, Ford 4.6L 2V Engine Specs — M11 x 1.5 x 210.5mm TTY bolt, aluminium block with steel cylinder sleeve.
- Summit Racing, Ford Modular 4.6L/5.4L 2V Windsor Torque Specs — the conflicting 6-stage figure discussed above.
- Fel-Pro TechTip, How To Install Gaskets - Clean & Dry — no sealer/RTV on modern head gaskets.
- Fel-Pro TechTip, How To Prepare An Engine Surface For Gasket Installation — surface finish and flatness specs.